Memory: What is the difference?

Depending on your Daisy application, you may need more or less onboard memory for things like capturing and recording audio. If you are unsure which memory version you need, we recommend examining the table below to see which option best suits your Daisy-based product.

Memory Option Applications
1MB
  • Oscillators
  • Utilities
  • Modulation
  • Non time-based effects
65MB
  • Samplers
  • Delays
  • Reverbs
  • Loopers
  • Granulators

A Visual Comparison

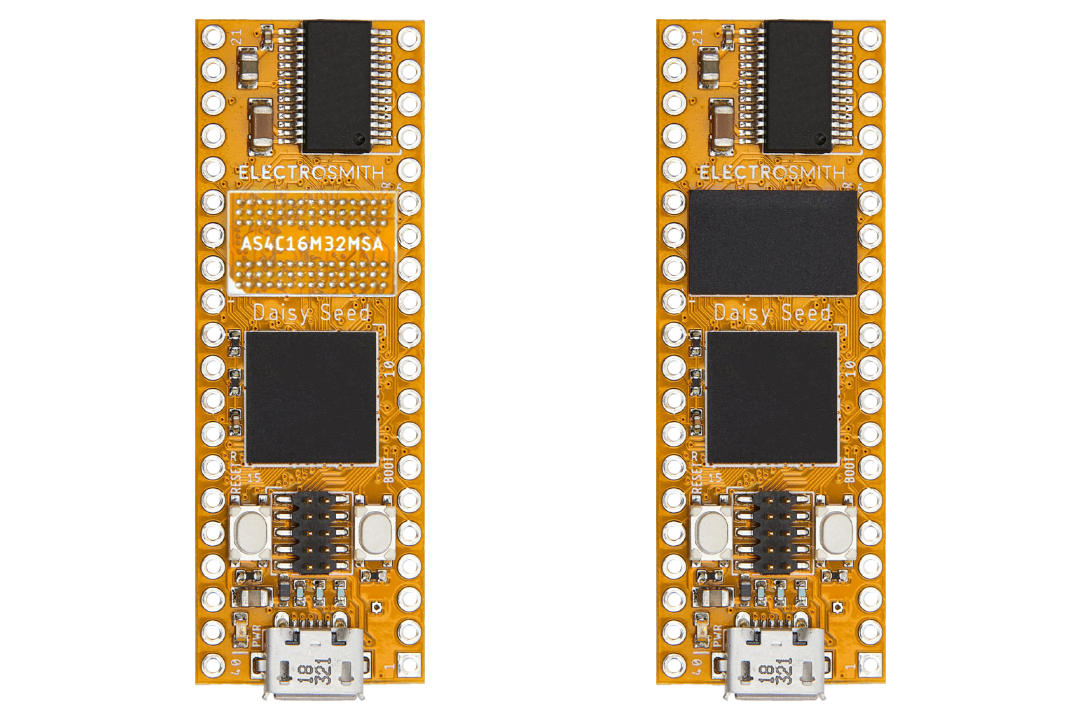
Examining both memory options for the Daisy Seed, you can see that the 1MB option (Left) does not include the 64MB SDRAM IC onboard, where the 65MB option (Right) does.

Note that the 1MB version still includes the 8MB of flash memory onboard.


How to determine your memory (RAM) needs

Not sure if you need the extra RAM? Check out the conditions below to confirm if your C++ or Arduino program requires the 65MB version:

  • Your C++ or Arduino program explicitly uses variables located in the 'DSY_SDRAM_BSS' section.
  • You built your program using "Oopsy" for Max/MSP gen~ integration.
  • You built your program using "pd2dsy" or "plugdata" for Pure Data intergration.

If you have run out of internal memory, and followed steps described in the External SDRAM Getting Started page, then you will need the 65MB model.

When compiling your program from source code, the final output will contain the memory usage split across all sections of memory including all internal memory sections, and external memory sections. This will look something like:

Memory region Used Size Region Size %age Used
FLASH: 99992 B 128 KB 76.29%
DTCMRAM: 0 GB 128 KB 0.00%
SRAM: 14360 B 512 KB 2.74%
RAM_D2: 16648 B 288 KB 5.65%
RAM_D3: 0 GB 64 KB 0.00%
ITCMRAM: 0 GB 64 KB 0.00%
SDRAM: 0 GB 64 MB 0.00%
QSPIFLASH: 0 GB 8 MB 0.00%

In the above example, you can see the various sections and how much of each is being used. The key item to look for is the SDRAM section. If this section’s “Used Size”, or “%age Used” are greater than 0, then the SDRAM is required for your program to run.

There are a few exceptions that will not display the usage after compilation. For example, you may have your heap located in the external SDRAM section (this would be done through the linker script) so that you can dynamically allocate large amounts of memory via `malloc()` or similar interfaces. Alternatively, you may be using pointers directly to access the SDRAM without storing them in variables (e.g. in a custom allocator, etc.). In both of these cases you likely already know that you require the SDRAM installed.

How to reduce memory needs

There are two cases where it becomes useful to reduce overall memory usage:

  • optimizing so that the application can run on the 1MB model (internal memories only)
  • fitting larger audio buffers within the external 64MB memory. Many of these techniques are useful in both of these cases.

Using other types for Audio Buffers

DaisySP, and most of the examples provided for Daisy use the `float` type for DSP operations, including buffers for storing audio in memory. The `float` type occupies 32-bits per variable (or per element within an array). It is possible to reduce your memory usage by up to 4x with various compromises on audio quality.

Below, we’ll explore a few options for doing so, and modify this example snippet of pseudo-code:

float buffer[BUFFER_SIZE]; // create buffer as a global array
...
for (i in size)
{
float sample = in[i]; // read sample from input
buffer[write_ptr] = sample; // store sample in a position in the buffer
float out[i] = buffer[read_ptr]; // read sample from buffer to output
}

Option 1: Halve your memory usage, without much noticeable difference in audio quality.

This is the recommended approach, as it will store your audio in 16-bit variables instead of 32-bit variables, which can be largely unnoticeable to most listeners (16-bit has been the commercial standard for CDs, etc. for decades, and contains a significant amount of SNR).

Option 1 requires the least amount of modification, and the functions required for the conversions are a part of libDaisy.

int16_t buffer[BUFFER_SIZE]; // create buffer as a global array
...
for (i in size)
{
float sample = in[i]; // read sample from input, convert to 16-bit
buffer[write_ptr] = f2s16(sample); // convert to 16-bit and store in the buffer
float out[i] = s162f(buffer[read_ptr]); // read sample from buffer, convert back to float for output
}

When doing this, you will want to make sure that you’re keeping your floating point values between -1 to 1, otherwise your signal will clamp, and result in added distortion.

Option 2: 1/4 your memory usage, with compromised audio quality (8-bit).

If you really need the extra space, and you’re not concerned about a loss in fidelity, you can convert down to 8-bit instead. The process for this is similar to converting to 8-bit. 

int8_t buffer[BUFFER_SIZE]; // create buffer as a global array
...
for (i in size)
{
float sample = in[i]; // read sample from input, convert to 8-bit
buffer[write_ptr] = f2s8(sample); // convert to 8-bit and store in the buffer
float out[i] = s82f(buffer[read_ptr]); // read sample from buffer, convert back to float for output
}

Same as with the 16-bit conversions, you will want to make sure that you’re keeping your floating point values between -1 to 1, otherwise your signal will clamp, and result in added distortion.

It is possible to reduce the loss in fidelity when using 8-bit by encoding the audio using the μ-law algorithm. However, that is outside the scope of this brief reference.

Moving buffers, and variables to other internal memory sections

The above notes about using other types for audio will generally be the source for the largest reduction in memory, since large buffers will most times, occupy the largest percentage of your RAM usage.

However, if you’re really close to squeezing everything that you need, you can take advantage of other sections in the internal memory to make it happen.

Depending on the APP_MODE you’re using, and whether you’re using the bootloader, all of your variables will end up located in a particular section of memory. Most times, this is this AXI SRAM (512kB).

As you may have noticed in the memory log shown above, you’ll see that there are other sections: DTCMRAM, RAM_D2, RAM_D3, and ITCMRAM. These are all internal, and available as part of the 1MB on the Daisy.

Using these sections is similar to using the external SDRAM, in that you will either need to use an attribute on a global variable, or use explicit pointers to access these sections.

For example, if you have a few small buffers that you use to store waveshapes, parameter states, or something similar, you can relocate them into another section.

For example, you might have a table:

float my_wavetable[512]; // default section, occupies 2kB

You can relocate this into DTCMRAM (128kB of available space) by changing the line:

float _attribute_section((section(".dtcmram_bss"))) my_wavetable[512];

Depending on the APP_TYPE, and the selected linker script, the default .bss section may be located in a different section. It is also worth noting that not all sections are populated in the default linker scripts, and that these scripts can be customized as needed. 

Customized linker scripts can be set in your application makefile by setting the `LDSCRIPT` variable to the desired file. Details on customizing the linker script are outside of the scope of this document.